The collision detection function helps to prevent or reduce the damage in case of a collision.
The robot controller continuously monitors the torque level of each axis. If any of the axis torques is higher than its defined maximum value (detect level) the robot will stop immediately.
By setting the torque limits to values which are just enough for the application, a collision can be detected as early as possible which helps reducing any damage.
- The collision detection function is being called SHOCK SENSOR LEVEL in the robot controller.
- Collision detection values are represented as percentage rated torque.
Library components
| Function blocks | |
|---|---|
MLxRobotGetCollisionDetectionStatus | Read status and torque levels of the collision detection. |
MLxRobotGetCollisionDetectionTorque | Read the measured maximum torques of the robot. |
MLxRobotResetCollisionDetectionTorque | Reset the measured maximum torques of the robot. |
MLxRobotSelectCollisionDetection | Select a collision detection file. |
MLxRobotSetCollisionDetectionProperties | Write allowed maximum torques to a collision detection file. |
MLxRobotSetCollisionDetectionStatus | Temporarily suspend the collision detection function. |
Availability
Please refer to the function block documentation to see which robot controllers support this function.
Parameters
Below overview shows the relevant parameters for this function.
S2C869 = 1
Restrictions
When testing your application on a controller in debug mode (or with detached robot), collision detection functions are limited, as shown in below table.
| Function | Behavior in debug mode |
|---|---|
MLxRobotGetCollisionDetectionStatus | returns empty data |
MLxRobotGetCollisionDetectionTorque | returns empty data |
MLxRobotResetCollisionDetectionTorque | no effect on robot controller |
MLxRobotSelectCollisionDetection | no effect on robot controller |
MLxRobotSetCollisionDetectionProperties | normal |
MLxRobotSetCollisionDetectionStatus | no effect on robot controller |
Determine what levels are needed
During operation the robot controller stores the measured maximum value for each axis. This information is very useful to determine what torque limit values are needed for the application.
- Run the application for a longer time to make sure the robot reaches its normal operating temperature. This is important because a “cold” robot requires higher torques due to the viscosity of grease and oil.
- Use
MLxRobotResetCollisionDetectionTorqueto reset the maximum values. - Run the application for a number of cycles. This should be done under normal conditions (e.g. speed, load).
- Use
MLxRobotGetCollisionDetectionTorqueto read the measured maximum values.
Read the active levels and status
Use
MLxRobotGetCollisionDetectionStatus
to see what levels are currently being used and if the collision detection
function is activated.
Cold start compensation
As long as the robot has not yet reached its normal operating temperature
the torque levels will be a bit higher (caused by the gearbox oil viscosity).
The collision detection system automatically compensates (+20%) for this
increased torque so that the user does not need to bother about this.
This results in temporarily increased detection levels as can be seen in
below image from a system where the levels have been set to 50% but are
automatically increased to 70%.
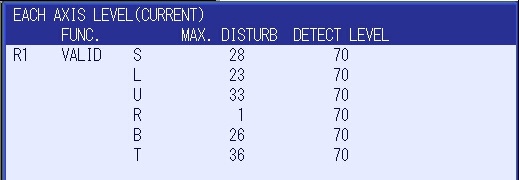
Above screen is found at ROBOT » SHOCK SENS LV. (CURRENT)
Changing collision detection levels
The collision detection settings are stored in files which are usually written at startup.
MLxRobotSelectCollisionDetectionis used for switching between diffent levels during production.- If you only need a single setting you can just overwrite the default file
#7(pendant: #8) withMLxRobotSetCollisionDetectionProperties.
Temporarily suspend the collision detection
In rare cases a collision leads to a deadlock situation where the robot cannot be moved away because there is still too much external force applied to the manipulator (and throws an alarm as soon as the servos are enabled).
In such case the solution is to temporarily suspend the collision detection
function so that the robot can be jogged out of the troublesome position.
The collision detection function can be suspended using
MLxRobotSetCollisionDetectionStatus
.
Example
A typical use case is a robot used for CNC machine tending:
- While moving inside the machine a rather sensitive collision detection is desired.
- While moving outside the machine very fast motions are used to achieve fast cycle times. These require higher detection levels.
Below pseudo code gives you an idea of the program structure for this use case.
// write files in startup routine
10  SetCollisionDetectionPropertiesHi   // e.g. FileNumber := 0

20  SetCollisionDetectionPropertiesLo   // e.g. FileNumber := 1

// -----------------------------------------------------------------------------

// production
10  SelectCollisionDetectionHi          // select high detection levels
                                        // FileNumber := 0

20  <some motion instructions>          // these motion instructions are using
                                        // high speed and thus require higher
                                        // torque levels
                                        // (transition: Sts_PC)

30  SelectCollisionDetectionLo          // select low detection levels
                                        // FileNumber := 1

40  <some motion instructions>          // these motion instructions are leading
                                        // the robot into the CNC machine and
                                        // require low torque levels to
                                        // prevent damage
                                        // (transition: Sts_PC)