The servofloat function limits the torque and disables position error monitoring for the selected robot axes.
Servofloat is useful for applications with motions where the robot is expected to not reach the target position (e.g. due to tolerances of the workpiece) or where external forces may be applied to the robot (e.g. workpiece being pushed out of an injection molding machine).
Servofloat can be used axis-wise (link servofloat) or cartesian (linear servofloat).
| setting | example | |
|---|---|---|
| link servofloat | torque for S/L/U/R/B/T | limit the torque for the S-axis |
| linear servofloat | frame, force for X/Y/Z, torque for R/B/T | limit the force of the Z-axis in the tool frame |
For both of these servofloat types there are eight setting files available in the robot controller. The settings need to be written before any motion takes place (e.g. during startup).
75% of the programmed path),
the Sts_PC signal won’t become active until the internal motion calculation
reaches 100%.Library components
| Data types | |
|---|---|
MLxAppDataServoFloat | Servofloat setting data. |
MLxAxisServoFloatData | Settings for axis servofloat. |
MLxFloatSettingData | Servofloat settings for a single axis. |
MLxLinearServoFloatData | Settings for linear servofloat. |
| Function blocks | |
|---|---|
MLxRobotSetServoFloatOff | Deactivate the robot servofloat condition. Motion commands sent after this MLxRobotSetServoFloatOff are no longer executed as servofloat motion. |
MLxRobotSetServoFloatOn | Activate the robot servofloat condition. Motion commands sent after this MLxRobotSetServoFloatOn are executed as servofloat motion. |
MLxRobotSetServoFloatProperties | Write servofloat settings to the robot controller. |
Availability
Please refer to the function block documentation to see which robot controllers support this function.
Parameters
Below overview shows the relevant parameters for this function.
// Yaskawa parameters (cannot be changed by customer)
FD34      1       // link servofloat
          3       // link & linear servofloat
Restrictions
- A standstill is required to switch servofloat on/off
- Linear servofloat is only supported by selected manipulators
- Servofloat cannot be used for jog commands
Monitoring
Servofloat active status
Certain events (e.g. MLxEnable) cause the servofloat to be switched off.
Therefore it is necessary to monitor the servofloat status so that immediate
action can be taken in case the servofloat was switched off unintendedly
during the process.
This status is not part of the MotoLogix data packet but you can
map it to one of the
ReadPacket.DigitalInputs
bits by adding a few lines in the robot CIO:
// CIOPRG.lst (PART2)
// MLx ReadPacket.DigitalInputs[0].0  <-- servofloat ON status of R1 (see Robot CIO manual)
STR #50510
OUT #00010
TCP feedback data
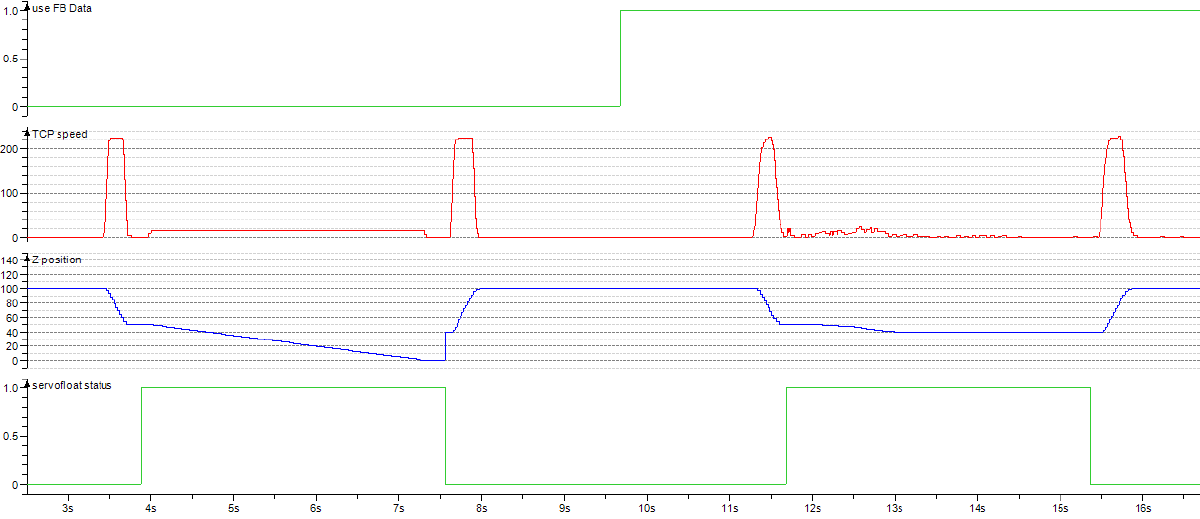
By default, the actual TCP position red by MotoLogix is the command position. However, when performing servofloat motions the feedback position is more useful:
| data from | after reaching hard stop | |
|---|---|---|
| command data | internal calculations | keeps moving |
| feedback data | physical manipulator | steady |
In below image the same servofloat trajectory is ran twice:
- first cycle shows command data
- second cycle shows feedback data
13sec
BlendFactor
The blend factor requires some attention in a program with servofloat motions. Below rules apply to the last motion before activating/deactivating servofloat.
Before activating servofloat:
BlendFactor=0results in a smooth transition into servofloat mode- Other blend factors might reduce cycle time but lead to a rough transition
- Consider using a custom blend factor
Before deactivating servofloat:
BlendFactor=0can lead to a unsuccessful fine positioning alarm and should be avoided- Consider using a custom blend factor
Creating a custom blend factor
You might consider to create a blend factor which is smaller than the default
ones. This way you can make a setting which has a narrow positioning window
but lacks the long time which comes with BlendFactor=0.
Pick a blend factor which is not yet used in your program and change its setting.
Example: change blend factor 8 to a distance of 0.5mm:
| parameter | original distance [µm] | new distance [µm] |
|---|---|---|
S1CxG 40 | 500000 | 500 |
Example
A typical use case is placing a workpiece into a fixture:
- The height of the workpiece varies due to manufacturing tolerances
- The workpiece will be pushed with a predefined force into the fixture using servofloat
- Once in position, fixture clamps close and the gripper opens
Below pseudo code gives you an idea of the program structure for this use case.
// write files in startup routine
10  SetServoFloatProperties   // write servofloat settings
                              //  - ServoFloatNumber := 0 (pendant: #1)
                              //  - ServoFloatType := 1 (linear)
// -----------------------------------------------------------------------------

// production
10  SetUserFramePlace         // activate the user frame for the fixture

20  MovePtpApproach           // PtP motion to the approach position
                              // (transition: Sts_PC)

30  FloatOn                   // activate the linear servofloat function with settings #1
                              //  - ServoFloatNumber := 0
                              //  - ServoFloatType := 1

31  MoveLinBottom             // linear motion to the bottom of the fixture
                              // motion performed with limited Z-axis force
    <in fixture>              // product pushed into fixture with the pre-set force
                              //  - actual command position still moving
                              //  - actual feedback position no longer moving

    <motion completed>        // motion completed
                              //  - actual command position no longer moving
                              //  - actual feedback position no longer moving
                              // (transition: Sts_PC)

40  <close fixture>           // close fixture clamps

41  <open gripper>            // open robot gripper

50  FloatOff                  // deactivate the servofloat function
                              //  - actual command position will change to reflect
                              //    the physical robot position

51  MoveLinApproach           // linear motion to the approach position
