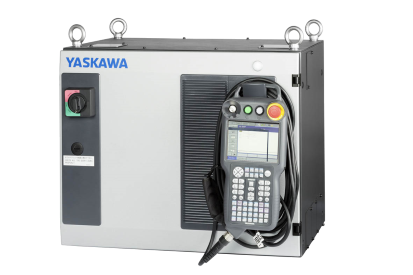
About
This is a customer specific MotoLogix setup with:
- Beckhoff PLC with PROFINET.
- PROFIsafe – using the older
2.4profile (3 byte CRC). - Various customer files pre-loaded by Yaskawa.
- and more
File information
Files supplied by the customer:
| File | CRC |
|---|---|
YSFLOGIC.DAT | 0438869801 (system)2737066245 (user) |
TLCHGMON.DAT | 2949782872 |
IPNETCFG.DAT | - |
Software version
YAS4.36 (exact match).Setup steps
Install fieldbus board
Mount the option board in the robot controller.Setup MotoLogix
Activate the (paid) option function (by Yaskawa) and setup MotoLogix for the desired fieldbus and PLC architecture.endianness:littleSetup fieldbus
Define the fieldbus data packet for MotoLogix.PROFIsafe profile:2.4Set parameters
Set the internal parameters required for MotoLogix usage.
The setup process requires the robot controller to be in maintenance mode
and a sufficient authorization level (management or higher).
Read more...
Activate maintenance mode:
- Power off
- Press (and hold) main menu
- Power on
- Release main menu when the beeping sound is heard (usually within a few seconds)
Change the authorization level:
- system » security » select
- select the desired level using ▼ ▲ » select
- enter the password and press enter
Additional steps
This setup requires a few additional (customer specific) steps.
FSU setting: Tool Number Select
setup » option function » functional safety
Functional safety setting item value Tool change monitor/Tool number select USED (NUMBER SELECT)The following step(s) of the setup process requires the robot controller to be in
normal modeand a sufficient authorization level (safetyor higher).Read more...
Activate normal mode:
- Power off
- Power on
Change the authorization level:
- system info » security » select
- select the desired level using ▼ ▲ » select
- enter the password and press enter
Load customer file: Safety Logic Circuit
Load the suppliedYSFLOGIC.DATinto the controller:
ex. memory » load » I/O data » YSFLOGIC.DATLoad customer file: Tool Number Select
Load the suppliedTLCHGMON.DATinto the controller:
ex. memory » load » file/general data » TLCHGMON.DATLoad customer file: LAN configuration
Load the suppliedIPNETCFG.DATinto the controller:
ex. memory » load » system data » IPNETCFG.DATVerify Safety Logic Circuit
Make sure the file was loaded properly by checking some content is available:
safety func. » safety logic circuitIn case there is no content: Reload the file.Confirm Safety Logic Circuit
Save and confirm: write » confirmConfirm Tool Number Select
Open the settings:
safety func. » tool number selectAfter loading the
TLCHGMON.DATfile, the settings are not complete yet: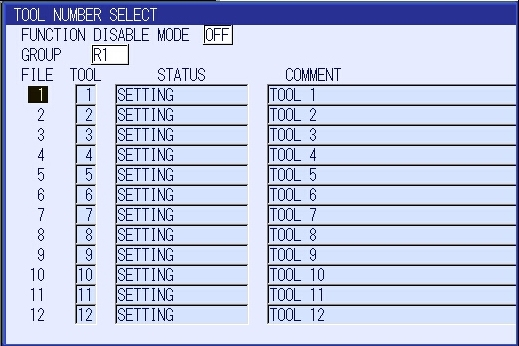
Settings incomplete We still have to finalize and confirm each file of Tool Number Select.To do this the following steps apply:
Select the file: ▼ ▲ » select
Set file valid cond to
SIGNAL.Now the imported input signal mapping becomes visible. It is marked red:
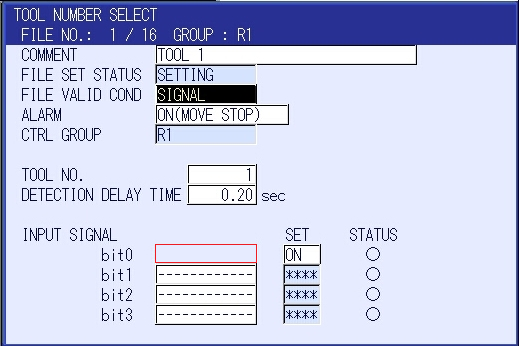
Set the condition Proceed with readback
Save and confirm: write » confirm
Repeat above steps for file 1 to file 16Now the settings for the Tool Number Select are complete:
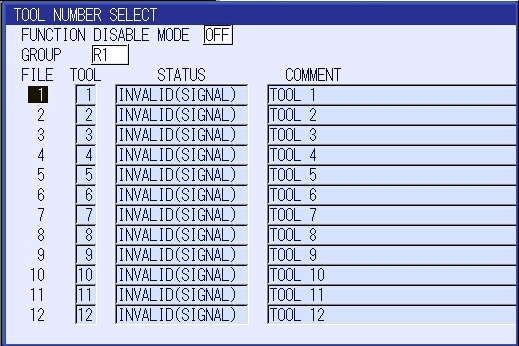
Settings complete
Install fieldbus board
Yaskawa robot controllers use various fieldbus solutions:
| type | description |
|---|---|
PCI | Large form factor option board |
PCIe | Compact form factor option board |
cpu board | Software option (uses the built-in LAN port) |
Setup MotoLogix
Open the MotoLogix option function settings: system » setup » option function » motologix

MotoLogix option function Customers: Please contact Yaskawa if the MotoLogix option function is not available in the list.Activate the MotoLogix option function:
This requiresYaskawaauthorization level and cannot be changed by the customer.
MotoLogix settings Enter the settings:
item value FUNCTION ENABLEDCONNECTION TYPE PROFINETENDIANNESS VIPA/S7-300/1500: BIG
others:LITTLECustomers can disable MotoLogix afterwards by settingFUNCTIONtoDISABLED.TheENDIANNESS(byte order) depends on the PLC cpu architecture.Use enter to confirm and leave the settings screen.
Setup fieldbus
CP1616 board settings
v2.8.fw16xx-2.8.1.0.0.fwl) can be downloaded from
the
Siemens Industry Support
website.Open the board settings: system » setup » option board » CP1616

Option boards Enter the settings:

PROFINET settings item value CP1616 USED (MotoLogix)Below settings only apply to systems with PROFIsafe (FD288):
PROFIsafe settings item value F_CRC_Length 3 byteF_Dest_Address 250This setup uses the PROFIsafe profile v2.4 which uses a 3 byte CRC. Don’t forget to change the profile in the iDevice configuration too.Customers can adjust theF_Dest_Addresssetting to their needs.Open the io device screen and enter the settings:

IO Device settings item value IO DEVICE ENABLEIO SIZE(IN/OUT) + MotoLogix 0 byte + 436 byteCustomers can adjust these default settings to their needs.
Example: To add an optional non-MotoLogix data packet of e.g.
32 byteset the value to32 byte + 436 byte.The size of theMotoLogixdata packet is fixed and shall not be changed.Adding a non-MotoLogix data packet might require to change/shift the address mapping of the MotoLogix data packet in the PLC.Use enter (multiple times) to confirm this- and the following screens. Don’t make any changes in these following screens (keep default IO allocation).
Load iDevice configuration
The CP1616 also needs to get a configuration loaded.
This is called the iDevice configuration.
Loading the CP1616 configuration is part of the customer’s commissioning process. It requires TIA Portal and takes about 10 minutes.
Read more...
The project contains two configurations for MotoLogix systems
(standard and PROFIsafe) and two for non-MotoLogix systems.
Choose the MotoLogix configuration which fits your setup:
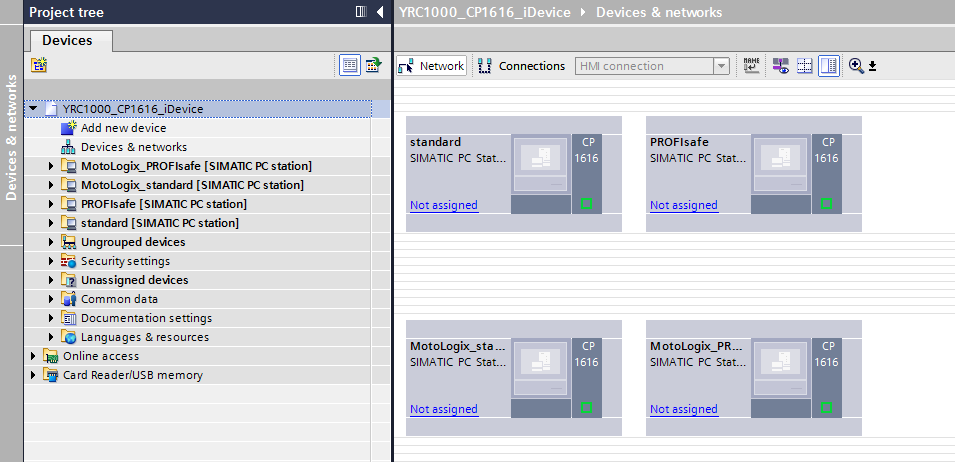
Available configurations Compile the hardware:
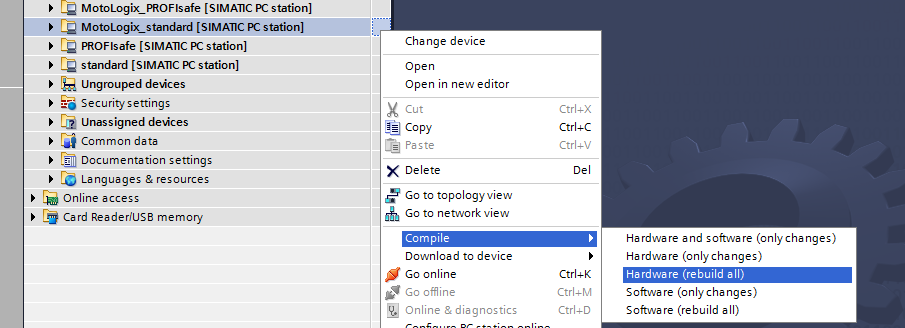
Compile hardware Download it into the CP1616:
This requires the robot controller to be inmaintenance mode.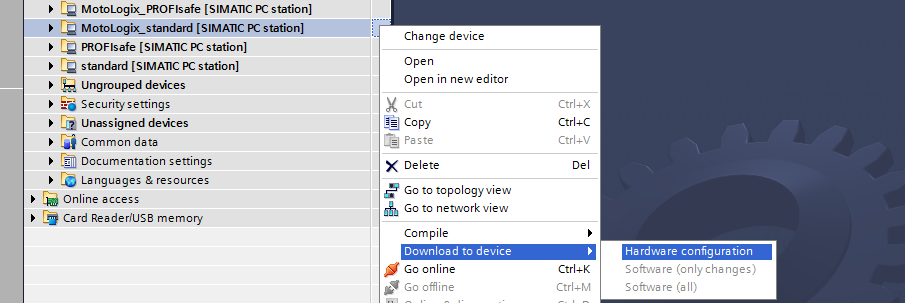
Download hardware configuration
Change PROFIsafe profile
If you want to use the older profile 2.4:
Change the profile:
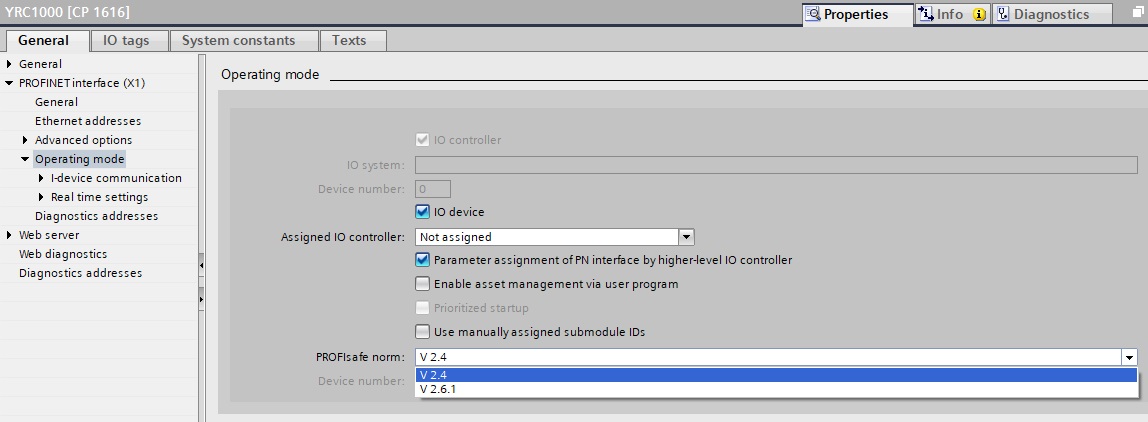
PROFIsafe profile setting Compile and download into the CP1616.
Export the new GSD file:

Export GSD Import the new GSD into your PLC project.
Parameter settings
Read more...
| parameter | value |
|---|---|
| FD 6 | 7 |
| FD 7 | 1 |
| FD 164 | 1 |
| FD 256 | 2 |
| FD 377 | 1 |
| MF1G 4 | 55 |
| RS 4 | 10 |
| RS 120 | 8 |
| RS 475 | 3 |
| S1C1G 57 | 0 |
| S1D 199 | 1 |
| S1D 229 | 0 |
| S1D 233 | 0 |
| S1D 256 | 2 |
| S2C 221 | 0 |
| S2C 244 | 2 |
| S2C 316 | 1 |
| S2C 541 | 0 |
| S2C 542 | 0 |
| S2C 869 | 1 |
| S2C 1015 | 2 |
| S2C 1139 | 0 |
| S2C 1142 | 3 |
| S2C 1147 | 0 |
| S2C 1205 | 1 |
| S2C 1419 | 1 |
| S2C 1586 | 1 |
| S2C 1702 | 1 |
| S2C 1703 | 1 |
| S2C 1704 | 1 |
| S3C 1380 | 50 |
| S3C 1385 | 120 |
| S3C 1387 | 1 |
